Oracle REST Data Services version 26.2 is now available.
- Download
- changeLog
- document
Let me quickly share the highlights.
Completing the Oracle AI Database MCP Server Trifecta
I will often answer this question: “Which MCP server should we choose?” And my answer would inevitably end up being, ‘it depends.’
I think starting with SQLcl is a good choice, especially for any proof of concept. Once you understand the flow, you will have a better idea of what you want for your security implementation. Regardless of which delivery vehicle you choose, DATABASE CONNECTIONS (and the users tied to those connections) remain the most important part of your security posture.
But yes, we now offer THREE MCP Servers for Oracle AI Database.
With ORDS version 26.2, we now offer
The following MCP servers:
- SQLcl – local, STDIO
- OCI Database Appliance – Managed serverless streaming HTTPS with OCI IAM authentication
- ORDS – HTTPS remote streaming, with your preferred identity provider (JWT)
Comparing our Oracle AI Database MCP Servers
| SQLcl | ORDS | OCI Managed MCP | |
| Most suitable | Developers, DBAs, power users | Developers, DBAs, power users across the company | Business users, analysts, shared AI agents, developers, devOps |
| Ideal workflow | Local DB exploration, development tasks, troubleshooting | Local DB exploration, development tasks, troubleshooting | Orchestrated natural language access to approved databases, validated reports, and SQL tools |
| Transport | STDIO | HTTP Streaming | HTTPS Streaming |
| Access model | DB credentials are available to local OS users | OAuth2.0, JWT with the scope or role of your preferred identity provider | Oauth 2.0, IAM OCI groups, federated or local users, MCP roles |
| Equipment | connection-list, connect, run-sql, run-sqlcl, schema information | list-database, run-sql, schema information | run-sql, list-report, run-report, schema information, a number of special tools |
| Operational model | lightweight local setup | customer-managed middle tier | Oracle managed OCI service |
| Database coverage | Oracle database with network access from local machine | Oracle database with network access from the middle tier | All Oracle AI Databases on OCI, Oracle @ AWS, Azure, & GCP (requires OCI connectivity) |
ORDS MCP architecture
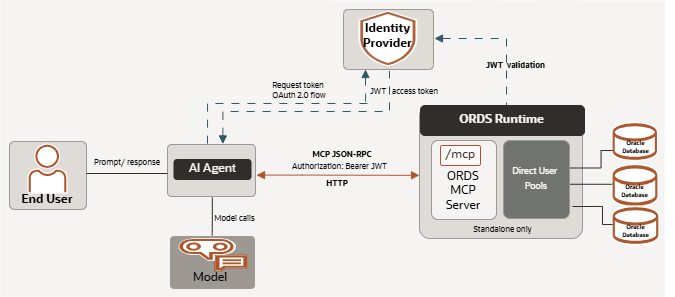
This is VERY similar to the architecture we have for ORDS when it comes to REST and APEX, but with the following caveats:
- This is only offered when ORDS is running standalone – that means no MCP feature if ORDS is used as a Tomcat or WebLogic servlet
- The database connection pool is a DIRECT user connection, not a proxy. This means that there is no ORDS_PUBLIC_USER, if you create an MCP pool with the user, ‘HR’, all authorized MCP Client Tool requests executed with that pool will be performed with an HR database connection.
- ORDS does not need to be installed in your database. No SYS connection required, no ORDS_METADATA schema to maintain.
- ORDS and the database are NOT available as your identity provider, so no ORDS-managed database or OAuth2 client credentials can be used to access the MCP pool, you MUST set up an external identity source, and it MUST be able to return JSON Web Tokens (JWT).
Points 3 and 4 simplify things. ORDS deployment becomes simpler, AND you can connect agent workflows with your existing single sign-on (SSO) security infrastructure.
A quick look at what it looks like with Auth0 and ORDS running on localhost
On the ORDS Side
It’s not a REAL world environment, but someone can set up ORDS on their laptop and quickly use it to see what’s going on before planning implementation in your company.
ORDS Global Settings
<properties>
<comment>Saved on Fri Jun 26 15:14:09 UTC 2026</comment>
<entry key="feature.mcp">true</entry>
<entry key="mcp.security.jwt.profile.audience"></entry>
<entry key="mcp.security.jwt.profile.authorization.server.url">https://my-autho0-server.us.auth0.com</entry>
<entry key="mcp.security.jwt.profile.issuer">https://my-auth0-server.us.auth0.com/</entry>
<entry key="mcp.security.jwt.profile.jwk.url">https://dev-my-auth0-server.us.auth0.com/.well-known/jwks.json</entry>
<entry key="mcp.security.jwt.profile.role.claim.name">/roles2</entry>
</properties>
If you run the ORDS installer, don’t expect any prompts to guide you through this. The installer is there to help you with database side installation for REST features. You can simply edit the XML file or use the ORDS CLI to add this configuration.
If feature.mcp is not set to ‘true’, then nothing else matters.
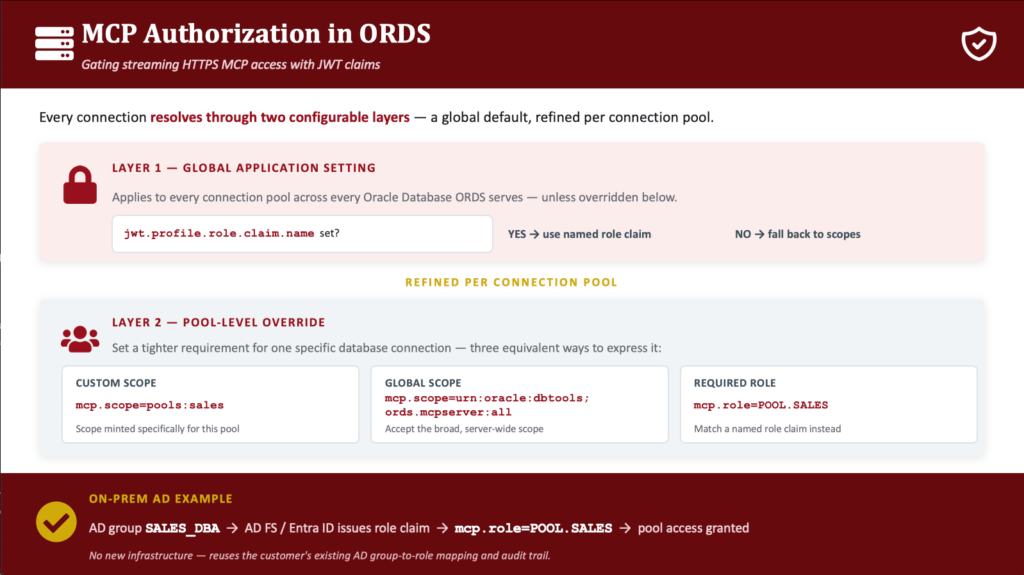
Setting role claims is optional, and depends on whether you want to use claims or role scopes, and it can be done in the global order layer or in the collection layer.
Please read the docs before trying this, unless you like running with scissors.
My MCP Pool Settings
<properties>
<comment>Saved on Fri Jun 26 12:35:35 UTC 2026</comment>
<entry key="db.connectionType">basic</entry>
<entry key="db.description">Human Resources MCP Acccess</entry>
<entry key="db.hostname">localhost</entry>
<entry key="db.port">1521</entry>
<entry key="db.servicename">freepdb1</entry>
<entry key="db.username">HR</entry>
<entry key="mcp.role">POOL.HR</entry>
</properties>Some new stuff here. Descriptions are now VERY important. When your Agent calls ‘list-database’, your Agent will get a list of names and descriptions. Make it ‘good’, so it’s easy for your agents to choose the CORRECT database connection to use!
mcp.role is optional. If I wanted, I could have Auth0 return a list of the ‘roles’ my user has, and those roles could be used to open/give access to one or more ORDS-managed MCP pools.
The role claim name is ‘roles2’ because Auth0 reserves ‘roles’ for itself, and doesn’t let you include them in your JWT. I found out the hard way.
If an authenticated user’s JWT includes the role name ‘POOL.HR’, then they can access the MCP pool I’m running. The name of this role is completely up to you and your organization. A real world role might look like ‘security-analyst-ERP-db-access.’
So in Azure Entra ID or Okta or whatever, if you’re using this role, just match it to what you’ve configured in ORDS, and you’re good to go.
On Auth0 Side
You can use ANY identity provider you want, you can even write your own! I chose Auth0 because it is well known and offers a free quote. Warning for the free one, it is for a limited time and supports a limited number of approved clients.
This is NOT a complete list or set of steps you should take to set up your Auth and JWT publishing. Most companies HAVE ALREADY solved this problem. So I’ll just point out some of the important parts.
My users must be created, and assigned appropriate roles.

My API requires the following set:
- Identifier set to ‘ – this is AUDIENCE, must be exactly the same as ORDS set for mcp.security.jwt.profile.audience. if you have an additional / on one side and not the other, the request will FAIL.
- Enable RBAC, ON
- default permissions for third party applications, ‘urn:oracle:dbtools:ords:mcpserver:all’ – this ensures scopes are available so ORDS will even listen or interrupt requests
- the following specific claims are specified
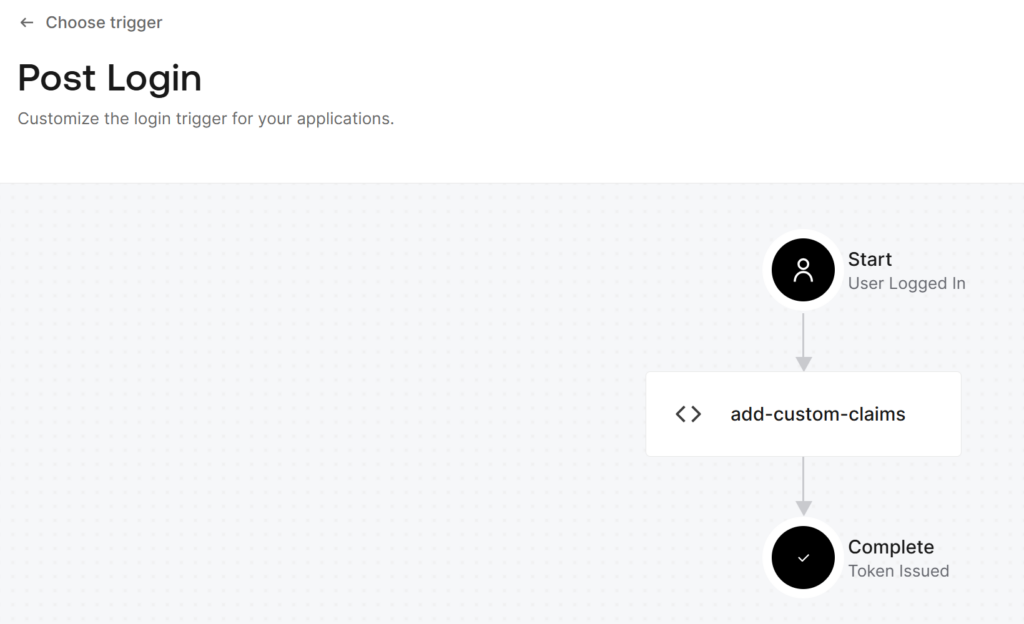
exports.onExecutePostLogin = async (event, api) => {
 const namespace = '';
 if (event.authorization) {
 api.idToken.setCustomClaim(`roles2`, event.authorization.roles);
 api.accessToken.setCustomClaim(`roles2`, event.authorization.roles);
 }
};
This allows Auth0 to add my ‘roles2’ claim to the issued JWT.
But to make it happen, I had to add this custom action via Trigger –
What it looks like from my AI Agent
I just need to point to the ORDS https address, which in my case is
Notice there are no ‘ords’ in that URL. And if I have a 1 or 300 MCP server pool, you should point to the base ‘mcp’ endpoint. It will provide tools, which will describe the pools (database connections) you can use.
If everything goes as planned, when I try to use my MCP Client to talk to ORDS MCP, I will be asked to authorize my new Client –
PakarPBN
A Private Blog Network (PBN) is a collection of websites that are controlled by a single individual or organization and used primarily to build backlinks to a “money site” in order to influence its ranking in search engines such as Google. The core idea behind a PBN is based on the importance of backlinks in Google’s ranking algorithm. Since Google views backlinks as signals of authority and trust, some website owners attempt to artificially create these signals through a controlled network of sites.
In a typical PBN setup, the owner acquires expired or aged domains that already have existing authority, backlinks, and history. These domains are rebuilt with new content and hosted separately, often using different IP addresses, hosting providers, themes, and ownership details to make them appear unrelated. Within the content published on these sites, links are strategically placed that point to the main website the owner wants to rank higher. By doing this, the owner attempts to pass link equity (also known as “link juice”) from the PBN sites to the target website.
The purpose of a PBN is to give the impression that the target website is naturally earning links from multiple independent sources. If done effectively, this can temporarily improve keyword rankings, increase organic visibility, and drive more traffic from search results.
Comments are closed, but trackbacks and pingbacks are open.